Features
Cost Effective Stop paying month-to-month subscription to web image and icon collections! Don't waste your money on licenses for every new domain where you want to place the menu! Pay once, use for life, anywhere!
Rollover Horizontal Menu In Dreamweaver 8 Multilanguage User Interface (MUI) Since the version 2.79 Dreamweaver Menu Extension supports the multilanguage user interface. Dreamweaver Menu Extension is translated into the numerous of languages such as: German, Dutch, French, Italian, Spanish, Portugues, Arabic, Polisch, Romanian, Hungarian, Bahasa Malaysia.
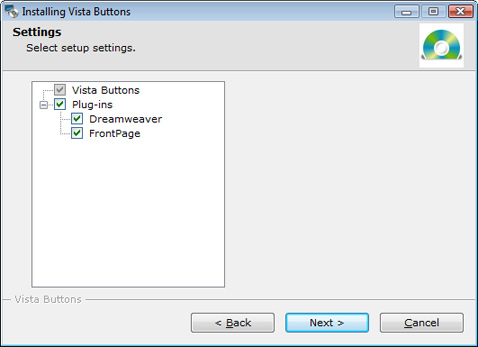
Creating Dynamic Left Nav Menus Html Button State You can create 1-state, 2-state, 3-state and 3-state toggle buttons using Dreamweaver Menu Extension. 1-state buttons are simple static image buttons. 2-state buttons respond to mouseOver event creating rollover effect. Mouse click doesn't change the button appearance. 3-state buttons support both mouseOver and mouseClick event. 3-state toggle buttons additionally stick in the pressed state after a click.
Tutorial Para El Dreamweaver Create Tab Navigation With Dreamweaver 8 Text-based menu You can create a menu with text-based top items. Such menu will be loaded more quickly on your website (in comparison with image-based navigation).
Menu structure is comprised of HTML nested UL and LI tags. Standards compliant menu structure is simple to customize and update.
Padding and Spacing Specify various values for padding and spacing for the whole menu and for each separate submenu.
Cross Browser Menu Full cross-browser compatibility including IE, Netscape, Mozilla, Opera, Firefox, Konqueror and Safari
2.0 Buttons by Web-Buttons.com v3.0.0 


 (please include template name in the message title)