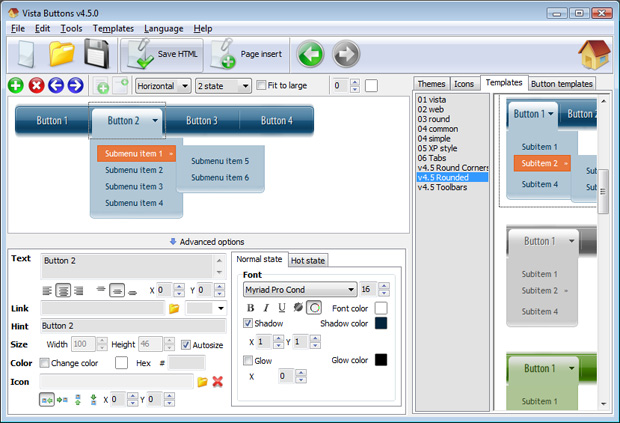
Membuat Button Di Dreamweaver Screenshots


Video Tutorial


The Vista Buttons Menu Extension for Dreamweaver allows you to create powerful dropdown menus, directly in Dreamweaver 3.0, Dreamweaver UltraDev 1.0, Dreamweaver 4, Dreamweaver UltraDev 4.0, Dreamweaver MX, Dreamweaver MX 2004, Dreamweaver 8, Dreamweaver CS3 or CS4. Create, insert, modify a css menu without leaving your favorite web design framework! Fully customizable appearance! Use one of the 500+ web buttons, 100 submenu designs, 6600+ icons, 50 ready-made samples, or create your own using the theme editor. With support for custom images, icons, colors, font styles, the possibilities are limitless. You'll create really nice looking web menus and web buttons with little or no design skills at all!


Menu, Button, and Icon Collection

Dreamweaver Menu Extension provides huge collection of 1400 web buttons, 6600 icons, 300 ready-made samples, so you'll create really nice looking menus and buttons with little or nodesign skills at all! Web 2.0, Mac, iPhone, Aqua buttons, Vista, XP, transparent, round, glossy, metallic, 3d, tab menus, drop down menus will be a breeze!

Button and Icon Samples

Features

Css Drop Down Menus
Create drop down menus based on css using Dreamweaver Menu Extension. Make various styles for each submenu item adjusting css styles.

Button Creator For Dreamweaver Fonts, Borders and Background Colors
Use any necessary font of any color, size and font decoration for normal and mouseover state. Create any available type, thickness and color of a menu's frame. Choose any color for backgrounds of submenus and items.

Transparent Rollover Navbar Menu Integration with popular web authoring software.
Dreamweaver Menu Extension integrates with Dreamweaver, FrontPage, and Expression Web as an extension/add-in. Create, insert, modify a menu without leaving your favorite web design framework!

Dreamweaver Menu Deroulant Membuat Button Di Dreamweaver Multilanguage User Interface (MUI)
Since the version 2.79 Dreamweaver Menu Extension supports the multilanguage user interface. Dreamweaver Menu Extension is translated into the numerous of languages such as: German, Dutch, French, Italian, Spanish, Portugues, Arabic, Polisch, Romanian, Hungarian, Bahasa Malaysia.

Export graphic picture
Using Dreamweaver Menu Extension you can save menu graphic picture as gif-files (*.gif).

High Quality and Professional Results
You don't have to know HTML, JavaScript, CSS or any other coding languages to make multi-state rollover web buttons, professional cross-browser, search engine friendly DHTML menus. All you have to do is make some clicks and adjust buttons as you wish for them to appear. Vista Web Buttons will generate all necessary images, html, javascripts, css styles automatically!


2.0 Buttons by Web-Buttons.com v3.0.0

How to use Dreamweaver Menu extension

    To install the menu into your html page you should do the following things:

    Create and save your buttons in any temp folder using Vista Buttons application. It will be better to export all menu code to external .js file. Go to "Tools/Export options...". Check "Save all menu params to js file" option.

    Export options

    You can use "Save as HTML" function.

    Save down menu dreamweaver

    You can enter any name you like, for example enter "menu":

    Save Dreamweaver menu name

    So you'll have menu.html file and "menu-files" folder with all menu files.

    Generated files

    Insert a down menu dreamweaver to many pages using Dynamic Web Template

    - Start Dreamweaver and open your website. When the website opens, it should look like this:

    Open website in Dreamweaver

    - Lets create the template for the website which we'll use on all pages. Delete all unnecessary code from this page.

    - Now you should add a down menu in your template page. Switch to the Design view mode. Decide where you would like the down menu to appear in your page. Click in the spot you want the code to appear in and type the phrase: your code here

    Dynamic Web Templates add menu

    - Open the generated in Vista Buttons menu.htmlpage in any text editor. Copy all code within the following tags:
          <!-- Begin Vista-Buttons.com -->
            ...
          <!-- End Vista-Buttons.com -->

    - We will now be inserting the JavaScript code into the body section right where we typed the phrase in the previous step. To do this, switch to HTML View.

    - Go to the "Edit Menu" with Dreamweaver and select the "Paste" option to paste the menu code that we copied to the clipboard earlier. Since the phrase we typed was highlighted, it will be replaced when we paste the code in.

    - To display images correctly you should change "menu-files/" to "templtes/menu-files/". Find the following code
    <!-- Begin Vista-Buttons.com -->
    <link href="templates/menu-files/styles_z7r36.css" type="text/css" rel="stylesheet"/>
    <script type="text/javascript"> var vbImgPath="templates/menu-files/"</script>
    <script type="text/javascript" src="templates/menu-files/scz7r36.js"></script>
    <noscript><a href="http://vista-buttons.com">Html Buttons Gif by Vista-Buttons.com v2.73</a></noscript>
    <!-- End Vista-Buttons.com -->

    Change path prefix in Dreamweaver

    - Switch to the Design view mode. Now you should select regions that will be editable. For example lets create three editable regions: two titles and the main content area. Right click the selected area, choose the templates, and make the template become new editable region.

    Dynamic Web Templates create editable region

    - You can enter any name you like, for example enter "content":

    Editable Region name

    - So, you'll have:

    Dynamic Web Templates create editable region

    - Save this file as a template. So, the file will store in the assets of the files.

    Dynamic Web Templates save as template

    - Your template will be saved in the "templates" folder. Now you should copy the "menu-files" folder into the same folder with your main_template.dwt page ("templates" folder).

    Copy menu files in Dreamweaver

    - Attach a Dynamic Web Template to your pages.
    a. Open the Web pages you want to attach a Dynamic Web Template to.
    b. On the Modify menu, point to Templates, and then click Apply Template to Page....
    c. Locate and click the Dynamic Web Template (main_template.dwt) you want to attach, and then click Select.

    Attach Template in Dreamweaver

    d. In the appeared window you should resolve the corresponding regions:

    Dynamic Web Templates Attach Template

    Dynamic Web Templates Attach Template

    Result

    - That's all. You've attached the template to your page, so let's test it. Select "File/Preview in browser/IExplore" to display the page live (in Internet Explorer).

    Result

    - If everything goes well, save and publish your website. If something seems wrong, double-check that you followed all the steps correctly.

    - If you still run into trouble, we'd be happy to assist you further. You can post your problem to us at , and meanwhile describe your files in details.


Support

Please contact Customer Support at (please include template name in the message title)


FAQ


See also

Membuat Label Berjalan MacroMedia DreamWeaver Dengan ASP 0 Berjalan ( Marquee ) di Atas Footer - Welcome to My Blog Membuat Berjalan/Marquee Video 6: Membuat Tombol Interaktif/Hover Button

Menghilangkan Footer Joomla 1.0 | Joomla Tutorial Setelah terbuka pilih file index.php di Macromedia Dreamweaver menghapus template pada joomla, membuat footer di joomla Combining Subscribe Button With A Help Button

Membuat Fungsi Mengira Hari melalui 'Button' | PHP.net.my Membuat Fungsi Mengira Hari melalui 'Button' melalui 'text field', 'button' tersebut terdapat di dalam form yang direka menggunakan adobe dreamweaver

Dynamic Drive CSS Library- CSS Image Gallery .htaccess Banning; Gradient Image Maker; Button Maker; Ribbon Rules; DD Whois Service Could you tell me how, please? (I know how to do that in Dreamweaver, but not with css)

Membuat Label Berjalan MacroMedia DreamWeaver Dengan ASP 0 Berjalan ( Marquee ) di Atas Footer - Welcome to My Blog Membuat Berjalan/Marquee Video 6: Membuat Tombol Interaktif/Hover Button

Cara Membuat Website Blogs, Pictures, and more on WordPress Cara Membuat Blog di Blogger.com. Bloggger adalah salah mbahpunk wrote 5 months ago: Belajar membuat website dengan dreamweaver New Twitter Tweet Button New Theme

TUTORIAL PEMBUATAN WEBSITE Adobe PDF - View as html

Yahoo! Answers - Bagaimana cara membuat website pribadi dengan Button di sini maksudnya mengubah tulisan biasa menjadi simbol software Microsoft Frontpage atau Macromedia Dreamweaver agar lebih mengenal aturan-aturan membuat homepage

Membuat Label Berjalan MacroMedia DreamWeaver Dengan ASP 0 Berjalan ( Marquee ) di Atas Footer - Welcome to My Blog Membuat Berjalan/Marquee Video 6: Membuat Tombol Interaktif/Hover Button

Membuat Foto Text cara nya klik Type tool terus klik di ujung Web Graphics, Photoshop 3D, Glass Button, old Membuat Web Menggunakan Dreamweaver

Macromedia Dreamweaver � St Thomas 1 Blog Flash button; Flash text; Rollover image Document body di gunakan untuk Click Macromedia Dreamweaver 8; Tampilan Dreamweaver. Memulai Membuat website :

APLIKASI WEB DATABASE ASP MENGGUNAKAN MACROMEDIA DREAMWEAVER+CD menjalankan program-program yang sangat rumit di server. Kupasan inti buku ini akan mengajarkan Anda cara membuat APLIKASI WEB DATABASE ASP MENGGUNAKAN DREAMWEAVER MX 2004

Membuat Web Album Foto Menggunakan Dreamweaver Membuat Web Album Foto Menggunakan Dreamweaver. downloadebookgratis.com Kalau laris, ciptakanlah album foto online di logos, designs, page headers, button icons

Cara Membuat Tabel di Blog | Tutorial blog | Blog Tutorial | Free Logo & Button; Membuat Menu D Tree (menu mirip pada windows 125 komentar ke Cara Membuat Tabel di Blog Thanks atas Roma. jika saya biasa menggunakan software Dreamweaver

How To Create A Simple Timeline Layer Position Animation In Dreamweaver 8 QuickSkills Press and hold down the left mouse button on a

Cara Membuat Website Cara Membuat Website dengan Dreamweaver Video Tutorial Yang Di dalam CD Tutorial ini membahas penggunaan Trik Membuat Submit Button dengan Image; Template