Bootstrap Tabs Styles
Overview
In some cases it's quite helpful if we have the ability to simply just put a few segments of info sharing the exact same space on page so the site visitor easily could browse through them without any really leaving behind the display screen. This gets simply obtained in the brand new 4th edition of the Bootstrap framework with the help of the
.nav.tab- *The best ways to apply the Bootstrap Tabs Styles:
To start with for our tabbed panel we'll desire several tabs. In order to get one set up an
<ul>.nav.nav-tabs<li>.nav-item.nav-link.activedata-toggle = “tab”href = “#MyPanel-ID”What is certainly new inside the Bootstrap 4 system are the
.nav-item.nav-link.active<li>Right now once the Bootstrap Tabs Plugin structure has been certainly prepared it is actually time for generating the control panels holding the concrete information to become shown. 1st we need to have a master wrapper
<div>.tab-content.tab-pane.fade.active.in.fade.tab-panelid = ”#MyPanel-ID”You have the ability to additionally develop tabbed sections employing a button-- like appearance for the tabs themselves. These are additionally referred like pills. To do it just ensure that as an alternative to
.nav-tabs.nav-pills.nav.nav-linkdata-toggle = “pill”data-toggle = “tab”Nav-tabs approaches
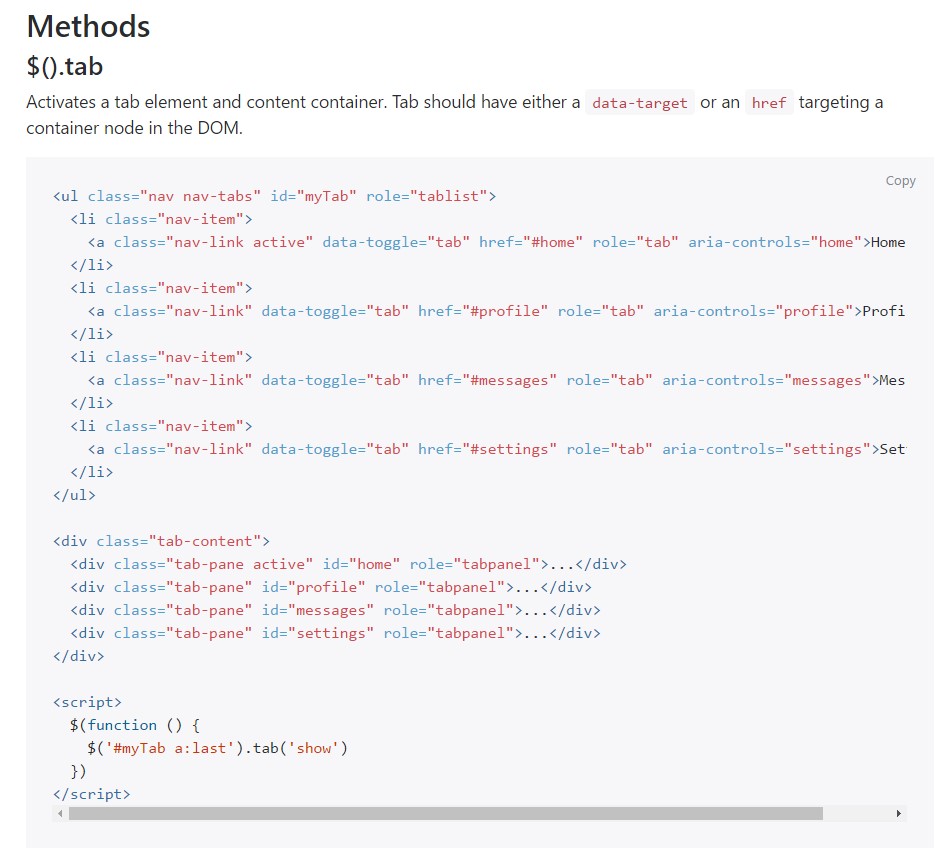
$().tab
$().tabTurns on a tab element and information container. Tab should have either a
data-targethref<ul class="nav nav-tabs" id="myTab" role="tablist">
<li class="nav-item">
<a class="nav-link active" data-toggle="tab" href="#home" role="tab" aria-controls="home">Home</a>
</li>
<li class="nav-item">
<a class="nav-link" data-toggle="tab" href="#profile" role="tab" aria-controls="profile">Profile</a>
</li>
<li class="nav-item">
<a class="nav-link" data-toggle="tab" href="#messages" role="tab" aria-controls="messages">Messages</a>
</li>
<li class="nav-item">
<a class="nav-link" data-toggle="tab" href="#settings" role="tab" aria-controls="settings">Settings</a>
</li>
</ul>
<div class="tab-content">
<div class="tab-pane active" id="home" role="tabpanel">...</div>
<div class="tab-pane" id="profile" role="tabpanel">...</div>
<div class="tab-pane" id="messages" role="tabpanel">...</div>
<div class="tab-pane" id="settings" role="tabpanel">...</div>
</div>
<script>
$(function ()
$('#myTab a:last').tab('show')
)
</script>.tab(‘show’)
.tab(‘show’)Selects the delivered tab and shows its involved pane. Any other tab which was recently chosen becomes unselected and its associated pane is covered. Turns to the caller before the tab pane has in fact been displayed (i.e. just before the
shown.bs.tab$('#someTab').tab('show')Activities
When revealing a brand new tab, the events fire in the following structure:
1.
hide.bs.tab2.
show.bs.tab3.
hidden.bs.tabhide.bs.tab4.
shown.bs.tabshow.bs.tabAssuming that no tab was already active, then the
hide.bs.tabhidden.bs.tab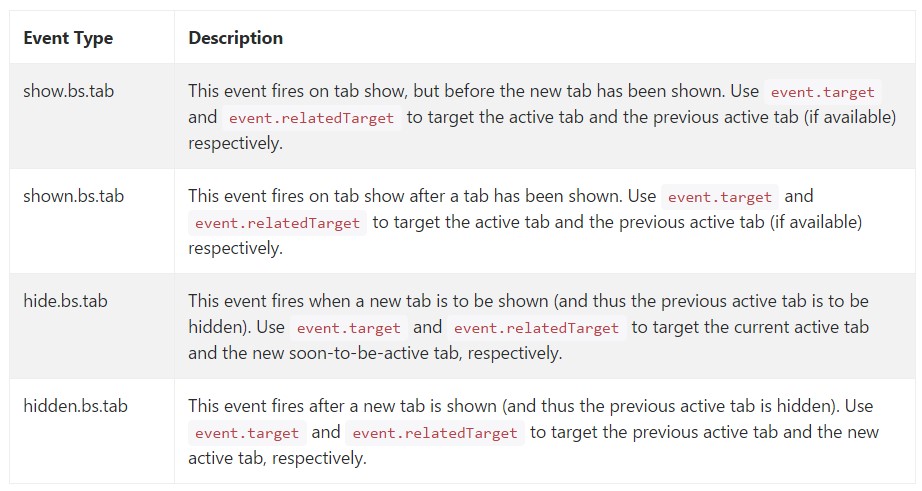
$('a[data-toggle="tab"]').on('shown.bs.tab', function (e)
  e.target // newly activated tab
  e.relatedTarget // previous active tab
)
Conclusions
Well essentially that is actually the method the tabbed panels get developed with the newest Bootstrap 4 edition. A matter to look out for when developing them is that the various elements wrapped inside every tab control panel need to be nearly the exact size. This will help you avoid several "jumpy" behaviour of your page once it has been actually scrolled to a certain placement, the site visitor has begun exploring through the tabs and at a certain place comes to open a tab along with considerably more content then the one being certainly discovered right before it.
Check a few on-line video short training about Bootstrap tabs:
Related topics:
Bootstrap Nav-tabs: authoritative documents
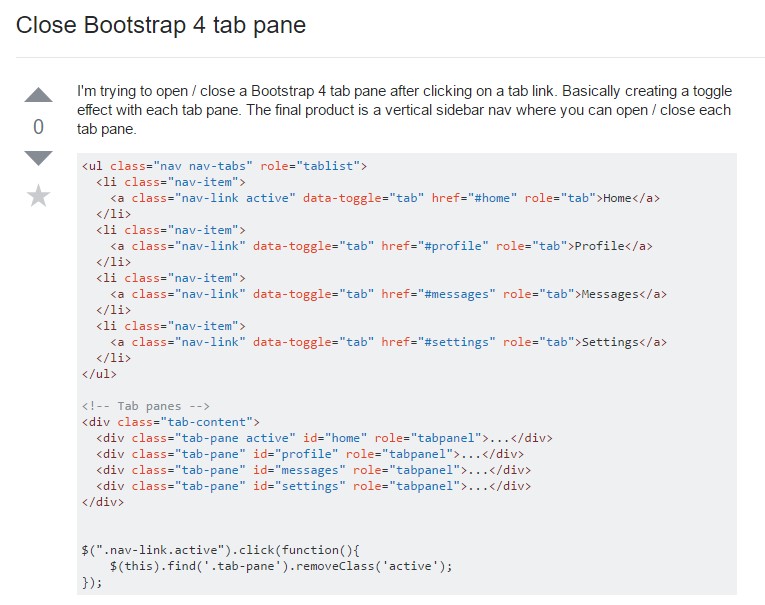
Ways to close Bootstrap 4 tab pane
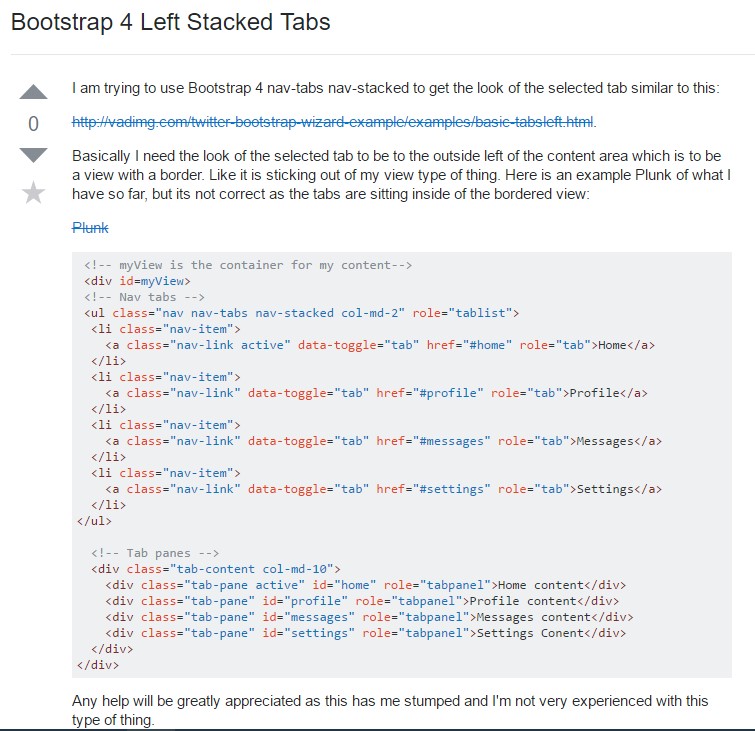
Bootstrap 4 Left Stacked Tabs