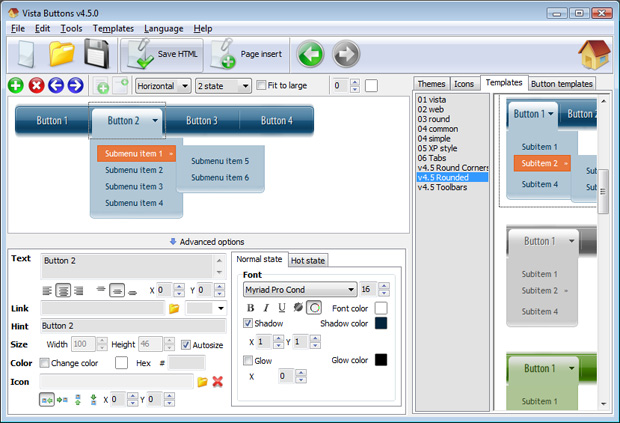
Html Css Layout Tutorial Dreamweaver Screenshots


Video Tutorial


The Vista Buttons Menu Extension for Dreamweaver allows you to create powerful dropdown menus, directly in Dreamweaver 3.0, Dreamweaver UltraDev 1.0, Dreamweaver 4, Dreamweaver UltraDev 4.0, Dreamweaver MX, Dreamweaver MX 2004, Dreamweaver 8, Dreamweaver CS3 or CS4. Create, insert, modify a css menu without leaving your favorite web design framework! Fully customizable appearance! Use one of the 500+ web buttons, 100 submenu designs, 6600+ icons, 50 ready-made samples, or create your own using the theme editor. With support for custom images, icons, colors, font styles, the possibilities are limitless. You'll create really nice looking web menus and web buttons with little or no design skills at all!


Menu, Button, and Icon Collection

Dreamweaver Menu Extension provides huge collection of 1400 web buttons, 6600 icons, 300 ready-made samples, so you'll create really nice looking menus and buttons with little or nodesign skills at all! Web 2.0, Mac, iPhone, Aqua buttons, Vista, XP, transparent, round, glossy, metallic, 3d, tab menus, drop down menus will be a breeze!

Button and Icon Samples

Features

Insert button script into the existing HTML page
You can insert your button script into the existing HTML page. To do so, click "Page insert" button on the Toolbar.

Dreamweaver 3d Drop Down Menu Search Engine Friendly
Dreamweaver Menu Extension generates html code which is transparent to search spiders.

Dreamweaver Extensions Menus Orientation of the Menu
Create both horizontal and vertical menus and submenus with any amount of menus on one page.

Navigation Bar Addon To Dreamweaver Html Css Layout Tutorial Dreamweaver Button State
You can create 1-state, 2-state, 3-state and 3-state toggle buttons using Dreamweaver Menu Extension. 1-state buttons are simple static image buttons. 2-state buttons respond to mouseOver event creating rollover effect. Mouse click doesn't change the button appearance. 3-state buttons support both mouseOver and mouseClick event. 3-state toggle buttons additionally stick in the pressed state after a click.

Save project. Save your image buttons as html
You can save current project in the project file (*.xwb) or into the HTML file (*.html).

Text-based menu
You can create a menu with text-based top items. Such menu will be loaded more quickly on your website (in comparison with image-based navigation).
Menu structure is comprised of HTML nested UL and LI tags. Standards compliant menu structure is simple to customize and update.


2.0 Buttons by Web-Buttons.com v3.0.0

How to use Dreamweaver Menu extension

    To install the menu into your html page you should do the following things:

    Create and save your buttons in any temp folder using Vista Buttons application. It will be better to export all menu code to external .js file. Go to "Tools/Export options...". Check "Save all menu params to js file" option.

    Export options

    You can use "Save as HTML" function.

    Save Dreamweaver navigation

    You can enter any name you like, for example enter "menu":

    Save Dreamweaver menu name

    So you'll have menu.html file and "menu-files" folder with all menu files.

    Generated files

    Insert a dreamweaver navigation to many pages using library

    - Start Dreamweaver and open your website. When the website opens, it should look like this:

    Open website in Dreamweaver

    - To create the library item you should do the following things:
    Create a new folder in the root of your website, for example "library". In this folder create a "New File" and name it menu.lbi.

    Create Library in Dreamweaver

    - Now you can add a javascript menu in your library. Open menu.lbi page (double-click menu.lbi in Files list window) and switch to the HTML View. Delete all code from this page. Open the generated in Vista Buttons menu.htmlpage in any text editor. Copy all code within the following tags:
          <!-- Begin Vista-Buttons.com -->
            ...
          <!-- End Vista-Buttons.com -->

    - Go back to Dreamweaver. Go to the "Edit Menu" with Dreamweaver and select the "Paste" option to paste the menu code that we copied to the clipboard earlier. To display images correctly you should change vbImgPath parameter. Find the following code
    var vbImgPath="menu-files/"
    and change it to
    var vbImgPath="library/menu-files/"

    Add menu code to a library in Dreamweaver

    - Save you menu.lbi file.

    - Now you should copy the "menu-files" folder into the same folder with your menu.lbi library file ("library" folder).

    Copy menu files in Dreamweaver

    - Create two pages and insert the library item to the pages.

    Add pages to your website in Dreamweaver

    - Open "Assets" tab in the Files list window. Select "Library" tab in the left side of this window. Drag the library item into your pages respectively. So, all your pages will have the same navigation. Save your page now.

    Drag library to your pages in Dreamweaver

    - Repeat the previous step for all pages where you want to have the javascript menu.

    - Notice that in the Design mode your menu won't display. It is normal. You should view your page in browser.

    Design mode in Dreamweaver

    - That's all. You've added all necessary code to your page, so let's test it. Select "File/Preview in browser/IExplore" to display the page live (in Internet Explorer).

    Result

    - If everything goes well, save and publish your website. If something seems wrong, double-check that you followed all the steps correctly.

    - If you still run into trouble, we'd be happy to assist you further. You can post your problem to us at , and meanwhile describe your files in details.


Support

Please contact Customer Support at (please include template name in the message title)


FAQ


See also

Adobe Dreamweaver: Creating CSS Layouts Tutorials Adobe Dreamweaver: Creating CSS Layouts tutorials, Adobe Dreamweaver: Creating CSS Layouts giving designers more control over the layout and design than straight HTML

Building CSS-Based Layout in Dreamweaver | Layers Magazine This tutorial covers the process of building a CSS-based layout from scratch using Dreamweaver. so I used ID (Applies to only one HTML

Good-Tutorials - HTML Tutorials Layouts HTML Tutorials Layouts in Photoshop, coding it up into a static HTML and CSS show you how to generate a slideshow in Dreamweaver

HTML Tutorials | Web Design Library HTML & CSS Tutorials about Links and Pseudo-Classes in CSS. I have made tutorials on your desktop called "portfolio layout

CSS Reference Sites | Cascading Style Sheets Standards and Cascading Style Sheets and Dreamweaver Float Html Tutorial layouts to CSS

Create a Full CSS Website or Web Page Layout Dreamweaver/HTML/CSS In this video we will start with a folder of images and in about 30 minutes construct a very simple 2 column layout using CSS to style our page!

Margins Tutorial at Dreamweaver FAQ.com In some cases a combination of both CSS and HTML is the preferences for Dreamweaver's CSS URL: http://www.dwfaq.com/Tutorials/CSS/css_issues6.asp

Dreamweaver CS3 Page Layouts Dreamweaver CS4 Tutorial Dreamweaver CS3 Page Layouts New > Blank Page > HTML > Select layout best suited to your needs] Prebuilt CSS layout options within Dreamweaver

Starting with HTML + CSS The resulting HTML page, with colors and layout, all done with CSS. writing the HTML. For this tutorial, I Style Master, Dreamweaver or GoLive. But for your very first CSS

myspace layouts in Dreamweaver? design a myspace layout in dreamweaver? I know myspace is done in css but HTML Code: Insert the following CSS into your About Me section:*/ /*Tutorial

CSS Reference Sites | Cascading Style Sheets Standards and Cascading Style Sheets and Dreamweaver Float Html Tutorial layouts to CSS

Adobe Dreamweaver CS5 Digital Classroom Tutorial The video tutorial for this lesson can be found Explore the ready-to-use CSS layouts available in Dreamweaver by choosing File > New, then selecting HTML from the Page

Designing with CSS Part 1: Understanding CSS Design Concepts What this series of tutorials will do is provide you with the ability to create CSS layouts using Dreamweaver 8. Once you have some of the basics down, you will move on

CSS, Dreamweaver, Dreamweaver Tutorial, CSS Tutorial, Adobe In this CSS Tutorial, I will show you how to Control Page Layout Using Dreamweaver and CSS to produce a simple and easy 2 Column CSS Page Layout. The basic (X)HTML

Starting with HTML + CSS The resulting HTML page, with colors and layout, all done with CSS. writing the HTML. For this tutorial, I Style Master, Dreamweaver or GoLive. But for your very first CSS

PSD to HTML/CSS Conversion Adobe Dreamweaver Learn how to create a layout in Adobe Photoshop then slice it up and code it using css, html and Adobe Dreamweaver with this easy to follow step-by-step guide. Adobe