How To 3 Stage Rollover Dreamweaver Screenshots


Video Tutorial


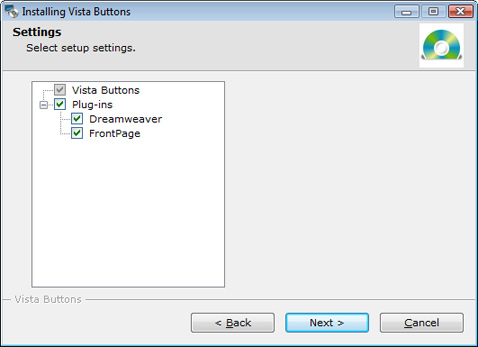
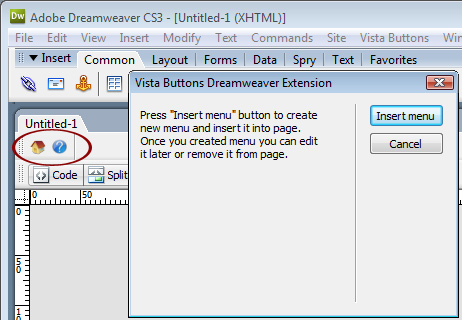
The Vista Buttons Menu Extension for Dreamweaver allows you to create powerful dropdown menus, directly in Dreamweaver 3.0, Dreamweaver UltraDev 1.0, Dreamweaver 4, Dreamweaver UltraDev 4.0, Dreamweaver MX, Dreamweaver MX 2004, Dreamweaver 8, Dreamweaver CS3 or CS4. Create, insert, modify a css menu without leaving your favorite web design framework! Fully customizable appearance! Use one of the 500+ web buttons, 100 submenu designs, 6600+ icons, 50 ready-made samples, or create your own using the theme editor. With support for custom images, icons, colors, font styles, the possibilities are limitless. You'll create really nice looking web menus and web buttons with little or no design skills at all!


Menu, Button, and Icon Collection

Dreamweaver Menu Extension provides huge collection of 1400 web buttons, 6600 icons, 300 ready-made samples, so you'll create really nice looking menus and buttons with little or nodesign skills at all! Web 2.0, Mac, iPhone, Aqua buttons, Vista, XP, transparent, round, glossy, metallic, 3d, tab menus, drop down menus will be a breeze!

Button and Icon Samples

Features

Insert button script into the existing HTML page
You can insert your button script into the existing HTML page. To do so, click "Page insert" button on the Toolbar.

Rollover Corner Webpage High Quality and Professional Results
You don't have to know HTML, JavaScript, CSS or any other coding languages to make multi-state rollover web buttons, professional cross-browser, search engine friendly DHTML menus. All you have to do is make some clicks and adjust buttons as you wish for them to appear. Vista Web Buttons will generate all necessary images, html, javascripts, css styles automatically!

Css Menu Buttons Professional Cost Effective
Stop paying month-to-month subscription to web image and icon collections! Don't waste your money on licenses for every new domain where you want to place the menu! Pay once, use for life, anywhere!

Mac Css Menu Tools Dreamweaver How To 3 Stage Rollover Dreamweaver Save project. Save your image buttons as html
You can save current project in the project file (*.xwb) or into the HTML file (*.html).

Fully Customizable
Every button or menu parameter can be easily customized in Dreamweaver Menu Extension to fit your web site design and your needs. Create your very own html menus, as simple or as complex as you want!

Create your own button themes
Theme editor helps you create your own themes or modify existing ones.


2.0 Buttons by Web-Buttons.com v3.0.0

How to use Dreamweaver Menu extension

    To install the menu into your html page you should do the following things:

    Create and save your buttons in any temp folder using Vista Buttons application. It will be better to export all menu code to external .js file. Go to "Tools/Export options...". Check "Save all menu params to js file" option.

    Export options

    You can use "Save as HTML" function.

    Save down menu dreamweaver

    You can enter any name you like, for example enter "menu":

    Save Dreamweaver menu name

    So you'll have menu.html file and "menu-files" folder with all menu files.

    Generated files

    Insert a down menu dreamweaver to many pages using Dynamic Web Template

    - Start Dreamweaver and open your website. When the website opens, it should look like this:

    Open website in Dreamweaver

    - Lets create the template for the website which we'll use on all pages. Delete all unnecessary code from this page.

    - Now you should add a down menu in your template page. Switch to the Design view mode. Decide where you would like the down menu to appear in your page. Click in the spot you want the code to appear in and type the phrase: your code here

    Dynamic Web Templates add menu

    - Open the generated in Vista Buttons menu.htmlpage in any text editor. Copy all code within the following tags:
          <!-- Begin Vista-Buttons.com -->
            ...
          <!-- End Vista-Buttons.com -->

    - We will now be inserting the JavaScript code into the body section right where we typed the phrase in the previous step. To do this, switch to HTML View.

    - Go to the "Edit Menu" with Dreamweaver and select the "Paste" option to paste the menu code that we copied to the clipboard earlier. Since the phrase we typed was highlighted, it will be replaced when we paste the code in.

    - To display images correctly you should change "menu-files/" to "templtes/menu-files/". Find the following code
    <!-- Begin Vista-Buttons.com -->
    <link href="templates/menu-files/styles_z7r36.css" type="text/css" rel="stylesheet"/>
    <script type="text/javascript"> var vbImgPath="templates/menu-files/"</script>
    <script type="text/javascript" src="templates/menu-files/scz7r36.js"></script>
    <noscript><a href="http://vista-buttons.com">Html Buttons Gif by Vista-Buttons.com v2.73</a></noscript>
    <!-- End Vista-Buttons.com -->

    Change path prefix in Dreamweaver

    - Switch to the Design view mode. Now you should select regions that will be editable. For example lets create three editable regions: two titles and the main content area. Right click the selected area, choose the templates, and make the template become new editable region.

    Dynamic Web Templates create editable region

    - You can enter any name you like, for example enter "content":

    Editable Region name

    - So, you'll have:

    Dynamic Web Templates create editable region

    - Save this file as a template. So, the file will store in the assets of the files.

    Dynamic Web Templates save as template

    - Your template will be saved in the "templates" folder. Now you should copy the "menu-files" folder into the same folder with your main_template.dwt page ("templates" folder).

    Copy menu files in Dreamweaver

    - Attach a Dynamic Web Template to your pages.
    a. Open the Web pages you want to attach a Dynamic Web Template to.
    b. On the Modify menu, point to Templates, and then click Apply Template to Page....
    c. Locate and click the Dynamic Web Template (main_template.dwt) you want to attach, and then click Select.

    Attach Template in Dreamweaver

    d. In the appeared window you should resolve the corresponding regions:

    Dynamic Web Templates Attach Template

    Dynamic Web Templates Attach Template

    Result

    - That's all. You've attached the template to your page, so let's test it. Select "File/Preview in browser/IExplore" to display the page live (in Internet Explorer).

    Result

    - If everything goes well, save and publish your website. If something seems wrong, double-check that you followed all the steps correctly.

    - If you still run into trouble, we'd be happy to assist you further. You can post your problem to us at , and meanwhile describe your files in details.


Support

Please contact Customer Support at (please include template name in the message title)


FAQ


See also

Adobe Dreamweaver CS3 - How to Create a Rollover Effect in CSS Views:2,312 Rating:3 Comments:1. Learn about creating a Rollover Effect in CSS in this Adobe Dreamweaver CS3 Essentials training video series

Adobe Dreamweaver CS3 - How to Create a Rollover Effect in CSS Views:2,312 Rating:3 Comments:1. Learn about creating a Rollover Effect in CSS in this Adobe Dreamweaver CS3 Essentials training video series

dreamweaver rollover Cool Text Effects Using CSS Styles in Dreamweaver - Links Rollover, Case Setting, Text Spacing, Line-through Effect Try out these cool text effects using CSS styles in

How to Create a Rollover Image in Dreamweaver - Dreamweaver 3 of 6 When you've completed all the fields, click OK to have Dreamweaver create your rollover image.

Rollovers in Adobe Dreamweaver CS3 : Adobe Dreamweaver Tutorial CS3 tutorial Abraham explores the capabilities of Dreamweaver to create dynamic rollover image that loads when the page loads before any rollovers occur. 3) Put

How to Create Interactive Rollover Buttons in Dreamweaver | eHow How to Create Interactive Rollover Buttons in Dreamweaver. Anyone visiting your website will it is important that the "Rollover" layer not be visible at this stage

Tutorial Flash Tutorial 3; Dreamweaver. Dreamweaver 1; This tutorial is about creating rollover images. full_pb.x = (stage.stageWidth - full_pb.width)/2; full

How to create rollovers in Photoshop and Dreamweaver CS3 | Video Add to Favorites Flag This PLAYLIST COMMENTS (3) SHARE 6,086 views software tutorial Layers TV Host RC shows you how to create rollovers in Photoshop and Dreamweaver CS3.

Creating a Mouse Rollover using Dreamweaver Inserting a Rollover Image using Dreamweaver. By: CivicCX. Objective: To teach you how to insert and 3) When the menu appears after hitting insert scroll down to Image

Rollovers in Adobe Dreamweaver CS3 : Adobe Dreamweaver Tutorial CS3 tutorial Abraham explores the capabilities of Dreamweaver to create dynamic rollover image that loads when the page loads before any rollovers occur. 3) Put

Dreamweaver Video Tutorial How To Create Rollovers Free Dreamweaver video tutorials from Total Training. Requires Quicktime. How to set the Link Page for your rollovers. 8.3 MB / 3:45 min [Quicktime is required to

Creating Rollovers in Dreamweaver CS3 | Layers Magazine Rollovers let your users know that they are interacting with the web page. In this tutorial, we will use Photoshop to create images to be used in both states of the

How to Make Disjointed Rollovers at Dreamweaver FAQ.com Disjointed rollovers are easy to create using Dreamweaver. You'll learn how to create multiple image swaps Repeat the above steps 3 through 8 on as many links as needed

Dreamweaver Tutorial - Get off to the right start with Dreamweaver 3 and 4 - a masterclass tutorial That's what I plan to cover, taking you through the fundamental stages

Dreamweaver Video Tutorial How To Create Rollovers Free Dreamweaver video tutorials from Total Training. Requires Quicktime. How to set the Link Page for your rollovers. 8.3 MB / 3:45 min [Quicktime is required to

Navigation bars with dreamweaver 3. After Up Image, type in the address an example of a navigation bar with rollover images created in Dreamweaver. Back to the Stage 4 Index]