Bootstrap Login forms Design
Intro
In some situations we need to defend our priceless web content to give access to only several people to it or dynamically personalize a part of our web sites depending on the particular customer that has been actually viewing it. But how could we potentially know each certain visitor's persona since there are simply so many of them-- we need to discover an easy and reliable solution learning about who is who.
This is where the site visitor accessibility monitoring arrives first engaging with the site visitor with the so familiar login form feature. Within the current fourth version of one of the most well-known mobile friendly web page production framework-- the Bootstrap 4 we have a plenty of elements for developing this kind of forms and so what we are simply heading to do right here is having a look at a detailed sample exactly how can a basic login form be produced using the useful instruments the current edition comes with. ( get more info)
How you can put into action the Bootstrap Login forms Layout:
For starters we require a
<form>Inside of it several
.form-groupTypically it's more handy to employ individual's email as opposed to making them figure out a username to confirm to you since generally any individual realises his email and you have the ability to always question your visitors another time to exclusively give you the solution they would like you to address them. So within the first
.form-group<label>.col-form-labelfor = " ~ the email input which comes next ID here ~ "After that we need an
<input>type = "email"type="text"id=" ~ some short ID here ~ ".form-controltypeNext comes the
.form-group<label>.col-form-labelfor= " ~ the password input ID here ~ "<input>After that comes the
.form-group<label>.col-form-labelfor= " ~ the password input ID here ~ "<input>Next we must set an
<input>.form-controltype="password"id= " ~ should be the same as the one in the for attribute of the label above ~ "Ultimately we require a
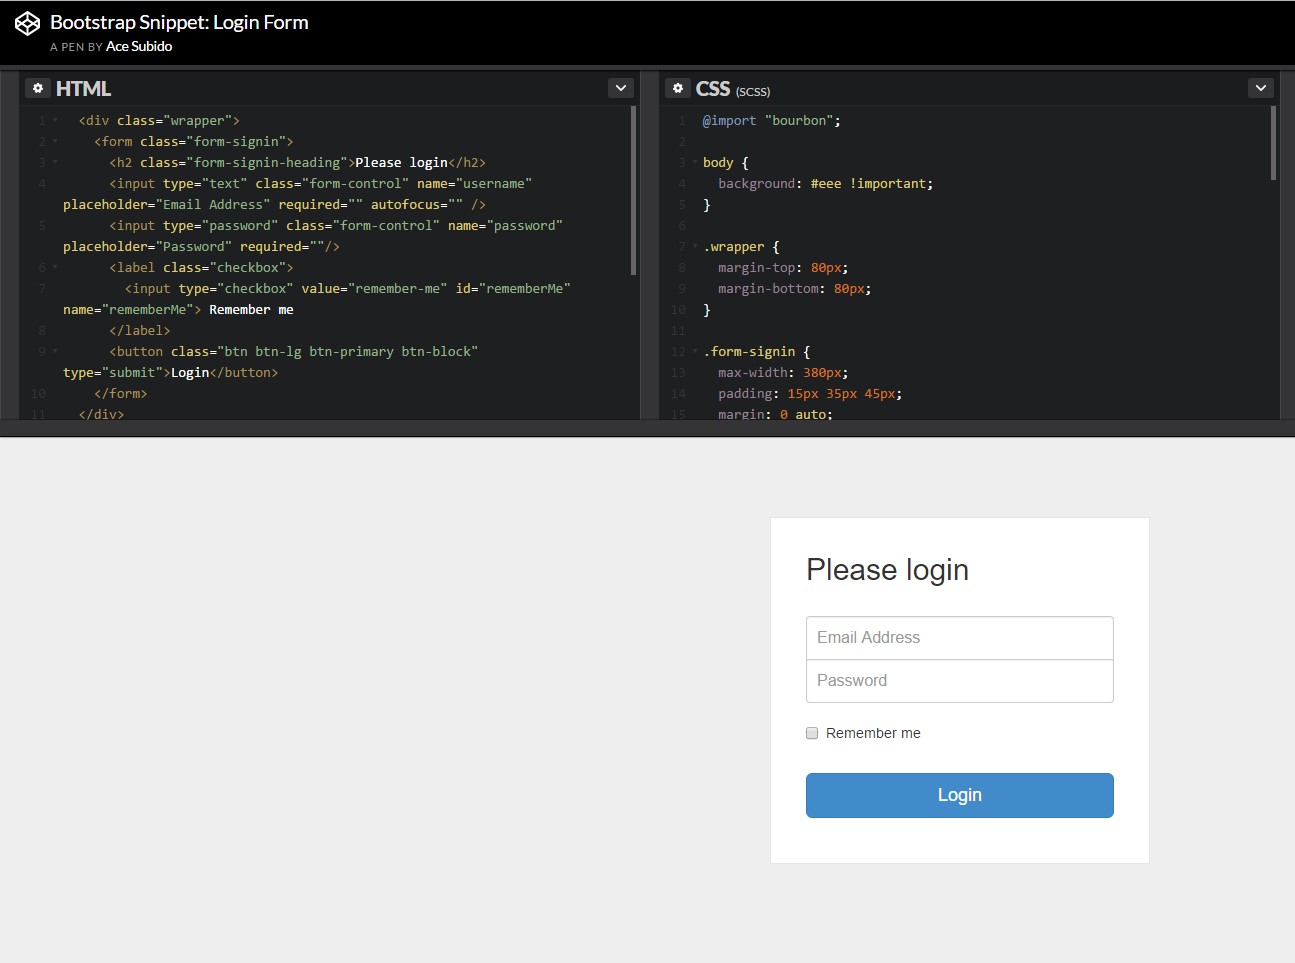
<button>type="submit"Example of login form
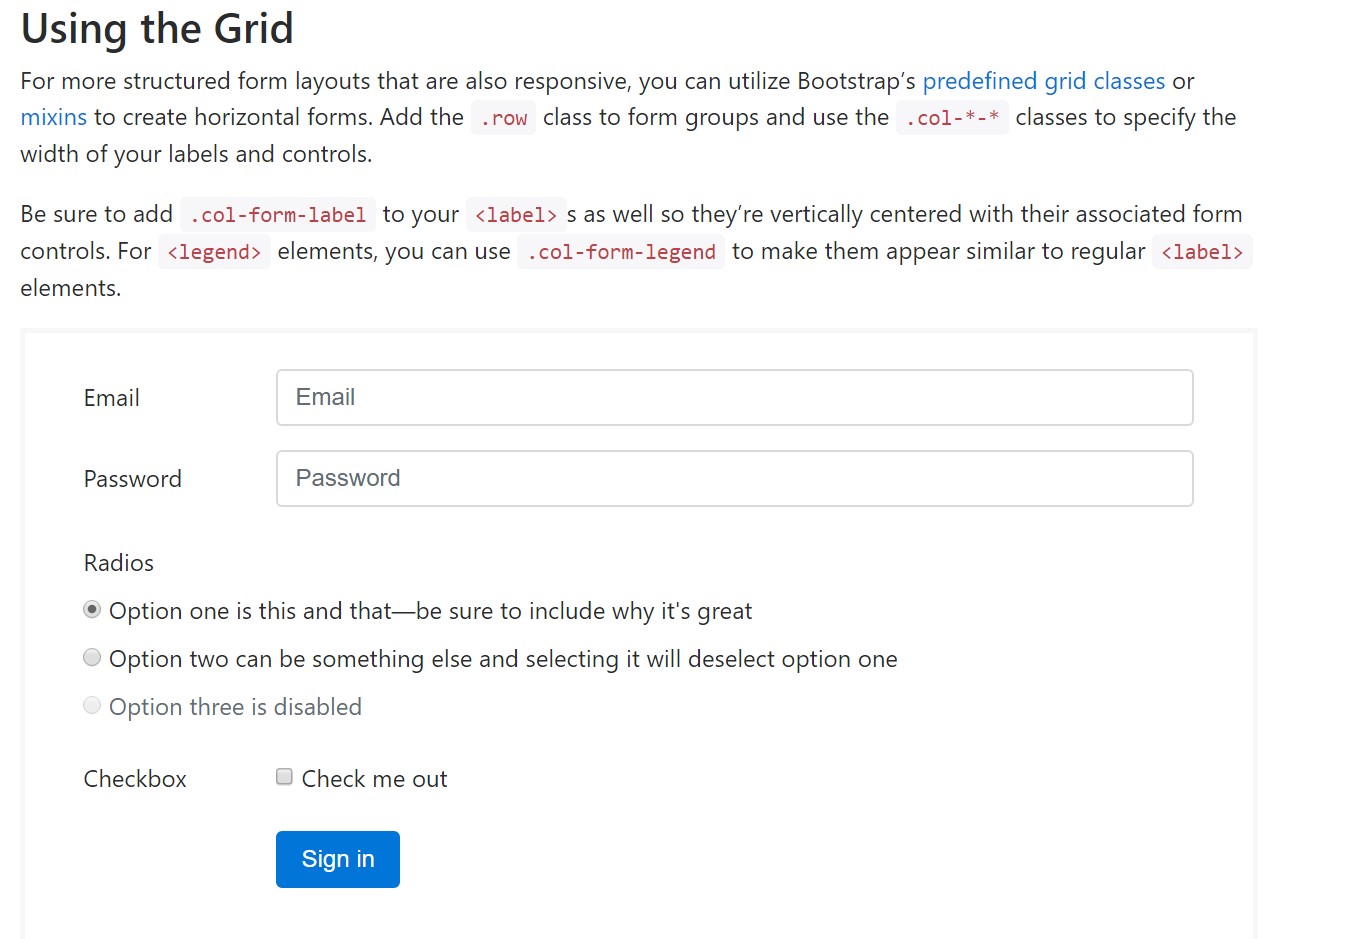
For even more organized form layouts that are equally responsive, you can certainly employ Bootstrap's predefined grid classes as well as mixins to produce horizontal forms. Provide the
. row.col-*-*Ensure to incorporate
.col-form-label<label><legend>.col-form-legend<label>
<div class="container">
  <form>
    <div class="form-group row">
      <label for="inputEmail3" class="col-sm-2 col-form-label">Email</label>
      <div class="col-sm-10">
        <input type="email" class="form-control" id="inputEmail3" placeholder="Email">
      </div>
    </div>
    <div class="form-group row">
      <label for="inputPassword3" class="col-sm-2 col-form-label">Password</label>
      <div class="col-sm-10">
        <input type="password" class="form-control" id="inputPassword3" placeholder="Password">
      </div>
    </div>
    <fieldset class="form-group row">
      <legend class="col-form-legend col-sm-2">Radios</legend>
      <div class="col-sm-10">
        <div class="form-check">
          <label class="form-check-label">
            <input class="form-check-input" type="radio" name="gridRadios" id="gridRadios1" value="option1" checked>
            Option one is this and that—be sure to include why it's great
          </label>
        </div>
        <div class="form-check">
          <label class="form-check-label">
            <input class="form-check-input" type="radio" name="gridRadios" id="gridRadios2" value="option2">
            Option two can be something else and selecting it will deselect option one
          </label>
        </div>
        <div class="form-check disabled">
          <label class="form-check-label">
            <input class="form-check-input" type="radio" name="gridRadios" id="gridRadios3" value="option3" disabled>
            Option three is disabled
          </label>
        </div>
      </div>
    </fieldset>
    <div class="form-group row">
      <label class="col-sm-2">Checkbox</label>
      <div class="col-sm-10">
        <div class="form-check">
          <label class="form-check-label">
            <input class="form-check-input" type="checkbox"> Check me out
          </label>
        </div>
      </div>
    </div>
    <div class="form-group row">
      <div class="offset-sm-2 col-sm-10">
        <button type="submit" class="btn btn-primary">Sign in</button>
      </div>
    </div>
  </form>
</div>
Final thoughts
Primarily these are the major features you'll require in order to make a standard Bootstrap Login forms Layout through the Bootstrap 4 framework. If you desire some more challenging appearances you are simply free to take a full benefit of the framework's grid system arranging the elements practically any way you would feel they need to take place.
Check out a few video tutorials relating to Bootstrap Login forms Code:
Connected topics:
Bootstrap Login Form main records
Tutorial:How To Create a Bootstrap Login Form
One more representation of Bootstrap Login Form